Source: http://www.macosxtips.co.uk/
Find out where a file came from
If you have a Downloads folder full of junk like I do, it can be useful to know where some files have come from. Luckily this information is displayed in the Get Info window. Just right-click on the file and choose "Get Info" or press Command-I.
In the Get Info window, click the "More Info" disclosure triangle and some extra fields should appear. If you look in the list you should find one called "Where from."
If you downloaded the file using Safari, this field will show you the web address of the page you downloaded the file from. If you received the file via iChat or a Mail attachment, the name of the person who sent it to you should appear.
Sometimes two web addresses are shown if the page with the download link is on a separate site to where the file was actually stored. See the screenshot below for an example.
I recently posted a tip over at Geeklets on how to display your Facebook news feed or recent notifications on your desktop using GeekTool. The whole process is a little bit complicated, but here’s a summary of what you have to do:
1) Get your Facebook feed address
This is just an RSS feed you can get from the Facebook site.
2) Create an Automator workflow
You need to create a short automator workflow that runs regularly and saves the recent items to a text file.
3) Optional: Make your workflow run in background
You can disable the Dock icon so the Automator workflow doesn’t bother you every time it runs.
4) Set up the GeekTool Geeklet
Finally you can just download the geeklet files that display the feed on your desktop.
Head over to the Geeklets site to see the full instructions. If you are new to GeekTool you might want to check out this introduction.
Menu extras are the little icon menus that live over on the right-hand side of your menu bar. Most people will probably have the Volume and Airport menus, but there are loads more that you can enable.You can find 26 built in ones located in /System/Library/CoreServices/Menu Extras that you can just double-click to start. On top of this there are many more that come with applications (like Evernote,QuickSilver and Tweetie) and some that are small applications themselves (like Caffeine, F.lux andiStat menus).If you have a lot of menu extras, you can rearrange them by holding the command key and dragging them around. To remove one, just hold command and drag it off the menu bar.One not so well known trick is holding down the Option key when clicking on the menus. For some of them this will reveal hidden settings and information that aren't normally shown in the menu. Here's what you'll see in the Option-click menu for some of the most common ones.
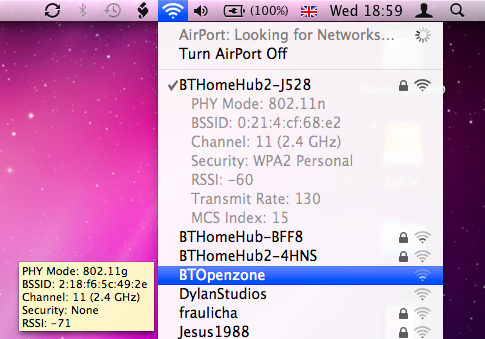
AirPort
In Snow Leopard the Airport menu has already got a lot more informative with the new way the icon displays the current status. In the Option-click menu you'll see a lot of extra information about your current wireless network, including the protocol (e.g. 802.11n), the signal strength (RSSI), security mode (e.g. WPA2 Personal), the channel (e.g. 11) and some other things like the hardware address and the transmit rate. If you want to get some of this information about another wireless network in the list that you aren't using, just hold your mouse over it and a yellow tooltip will appear.
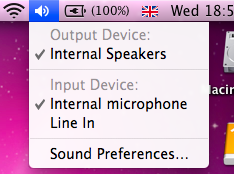
Volume
This menu normally just shows a slider for you to adjust the volume, but option-clicking shows some settings that you can normally change in the Sound section of System Preferences. It allows you to select different input and output devices, such as an external microphone or external speakers.
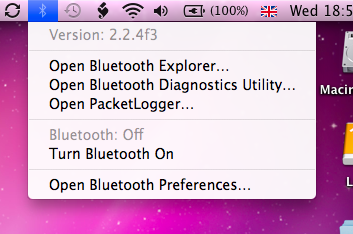
Bluetooth
If you have Bluetooth on your Mac, option-clicking the menu will show you the bluetooth version number. If you have the developer tools installed, it will also give you options to open Bluetooth Explorer and Packetlogger.
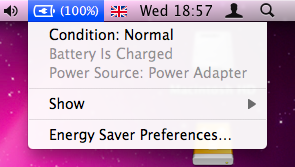
Battery
This one is just for laptop users. Option-clicking will add an item at the top of the menu that displays the condition of your battery. Clicking on this will open up a help page explaining what your condition means. You can find out more information about your battery here.
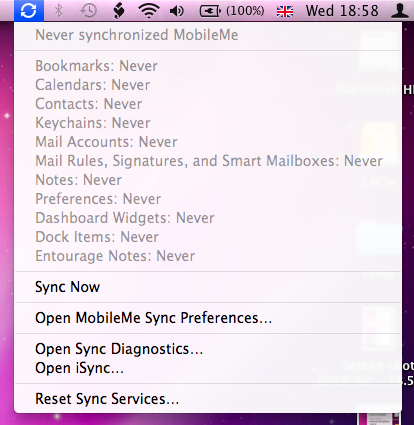
iSync/MobileMe
A normal click on this menu gives the time of the last sync, but option-clicking gives a huge list of the last time each individual data type was synced (i.e. Bookmarks, Calendars, Contacts etc.). It also adds in an option to open Sync Diagnostics and iSync, as well as giving the option to reset sync services.
Time Machine
In this one, Option-clicking changes "Enter Time Machine" to "Browse Other Time Machine Disks". This brings up a dialog listing all the connected drives that contain Time Machine backups. Select one and click Use Selected Disk to browse the Time Machine backup.

tell application "Finder" move items of (path to desktop folder) to folder (path to documents folder) end tell
If you click Run, you should see all the items on your desktop move into your Documents folder. Choose Save As from the File menu, give the script a name like cleardesktop and change the File Format to Application. Save it somewhere safe where someone won't accidentally delete it. I have a folder inside my Documents folder called Scripts where I keep all my AppleScripts. Other people choose to store their scripts in the Scripts folder in the Library folder, because Apple has already put some ready made ones in there.
The next step is to make it run every time you shut down your Mac. This is pretty tricky to do, and involves using a lot of Terminal commands. Instead, a much easier way is to make the script run when you log in, which will essentially do the same thing. Just go to System Preferences, and click on the Accounts section. Choose your account from the list on the left, and then click on the Login Items tab. You can now either click the plus (+) button and locate your script, or just drag the script from a Finder window into the list.
Now, whenever you turn on your computer, all the clutter left over from the previous user will be automatically moved into the Documents folder.
The above script is just about as basic as you can get. Here’s an idea for a more complicated version. Instead of just dumping everything in your documents folder, it instead creates a folder in there with a name that includes todays date ( e.g. “Desktop 13/01/2010” ) and puts the items in this folder instead.
set foldername to ("Desktop " & short date string of (current date)) set docsfolder to (path to documents folder) as string tell application "Finder" if not (exists folder (docsfolder & foldername)) then make new folder at docsfolder with properties {name:foldername} end if move items of (path to desktop folder) to folder (docsfolder & foldername) end tell
Alternatively, the following script checks the file extension of all the files on the desktop, and sorts them into the Movies, Pictures, Applications and Documents folders depending on what they are. If you are feeling adventurous, you can modify the script to include your own folders and file extensions.
tell application "Finder" set desktopFolder to (path to desktop folder) set musicFolder to (path to music folder) set appsFolder to (path to applications folder) set picsFolder to (path to pictures folder) set moviesFolder to (path to movies folder) set docsfolder to (path to documents folder) set musicExt to {".mp3", ".aac"} set appsExt to {".dmg", ".sit", ".app"} set picsExt to {".jpg", ".gif", ".tif", ".png", ".psd"} set moviesExt to {".avi", ".mpg", ".mov", ".m4v"} set docsExt to {".pdf", ".txt", ".doc", ".xls", ".key", ".pages"} set allFiles to files of desktopFolder repeat with theFile in allFiles copy name of theFile as string to FileName repeat with ext in musicExt if FileName ends with ext then move theFile to musicFolder end if end repeat repeat with ext in appsExt if FileName ends with ext then move theFile to appsFolder end if end repeat repeat with ext in picsExt if FileName ends with ext then move theFile to picsFolder end if end repeat repeat with ext in docsExt if FileName ends with ext then move theFile to docsfolder end if end repeat repeat with ext in moviesExt if FileName ends with ext then move theFile to moviesFolder end if end repeat end repeat end tell
10 Security and Privacy Tip
1. Disable "Open safe files after downloading"
If you do one thing this article suggests, this should be it. Unticking just one checkbox will protect you from most of the few dangerous Mac exploits around on the internet.In Safari, choose Preferences from the Safari menu and then click on the General tab. Near the bottom, un-check the checkbox that says "Open safe files after downloading". There. Done.
2. Disable automatic login
Even if you only have one user on your Mac, requiring a username and password when starting up is great for security, especially if you have a laptop that can more be easily lost or stolen. You can do this from the Security section of System Preferences, by checking the checkbox "Disable automatic login".
While this isn't going to stop someone intent on stealing your personal data, regular thieves are more likely to just wipe the hard drive rather than going through all your personal stuff first.
3. Lock screen when away
There are a couple of ways to make your Mac require a password when you leave it. The easiest way is to set "Require password after sleep or screen saver begins" in the Security section of System Preferences. Here, you can also set a time limit so a password isn't required right away, but only after 15 minutes for example.
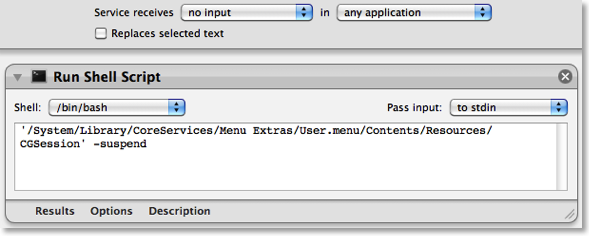
If you would prefer a keyboard shortcut to lock the screen, you can create this yourself. Open up Automator (in the Applications folder) and choose a Service template. From the library choose "Run Shell Script" and drag it across to the workflow area. In the text box paste the following command:
'/System/Library/CoreServices/Menu Extras/User.menu/Contents/Resources/CGSession' -suspendFinally, change the "text" drop-down menu above the workflow to "no input" and then save you workflow as "Lock Screen". To add the keyboard shortcut, go to the Keyboard section of System Preferences and click the Keyboard shortcuts tab. Select Services from the list on the left, then scroll down to the bottom of the list on the right to find "Lock Screen". Double-click on the area to the right "Lock Screen", then press the keyboard shortcut you want. I used Command-Control-L.
4. Use 1Password to create and store internet passwords
One of the problems with having lots of accounts on the internet is that for them to really be secure, they should all have a different password. For example, if you use the same password for your bank account, your email account and some shady disreputable website, you are asking for trouble.
My solution to this is to use an application called 1Password to create and remember all my passwords for me. The only three passwords that I remember myself are my email password, my bank password and a master password for 1Password. All the others - for Facebook, reddit, Amazon, etc - are randomly generated 20 character strings that are created and remembered for me by 1Password. When I go to one of those web sites, 1Password simply prompts me for my master password, then fills in the rest for me.
Some of this functionality can be replicated for free using Keychain Access, but the real benefit of1Password is its automation, and the fact that it works in Safari, Firefox and on your iPhone so you don't have to save your passwords separately for each.
5. Turn on the firewall
Mac OS X comes with a built in firewall, but it is actually turned off by default. You can turn it on in the Security section of System Preferences. The Mac OS X firewall is really simple to set up - just click start to turn it on. Some applications will have trouble working through the firewall, instant messengers for example. If you find you start having connection problems with an application, just add it to the allowed list in the firewall preferences.
6. Little Snitch
While a Firewall protects your computer from unwanted connections from the outside, Little Snitchdoes the opposite and blocks your private data from being sent out. If you start an application and it tries to send some data out to a server on the Internet, Little Snitch will inform you and ask if you want to allow it. Read more over at the Little Snitch site.
7. Encrypt and hide your private files
It isn't entirely obvious how to password protect files or folders in Mac OS X but there are a couple of ways.
If you just want to protect a single iWork or PDF document, you can do this from within the specific iWork application or from within Preview. In Pages, Keynote and Numbers '09 you can choose "Require password to open" from the Document section of the Inspector window. In Preview, when choosing "Save As.." on a PDF there is a checkbox to encrypt.
If you want to password anything else, you have to password protect an entire folder. The way this is done is using encrypted disk images. Once created these appear as a single file on your hard drive with a dmg extension. When you double-click on one, it will ask you for the password. If you enter the password correctly, it will mount a disk image on your desktop. So while unlocked, the disk image is just like a temporary folder on your desktop. You can copy files to it and delete files from it, and as soon as you eject it, the contents will be password protected again. Here’s a detailed article about how to set up a disk image.
8. Use FileVault
Personally, I don't use this option, but for those who want to be ultra-secure it is an amazing feature. It is similar to creating an encrypted disk image for some files, but instead it does this for your entire user folder. It is much more straightforward and transparent than setting up an encrypted disk image too. Just turn it on the Security section of System Preferences, and all your files will be unencrypted and encrypted on the fly when you log in and out of your computer.
I would say this is probably overkill for most users. If you have an encrypted disk image for your most sensitive files, then it is a bit redundant to then encrypt your entire user folder. It also causes some problems concerning Time Machine backups, and also huge problems if you happen to forget the password…
9. Secure Empty Trash
More and more people now realise that when you delete something off your hard drive, it doesn't actually get physically removed from the disk. All references to it are gone, but it stays there until something else is written over it. For private documents this is a bad situation because someone with some special software can recover you supposedly deleted files.
To prevent this, you can use the "Secure Empty Trash…" option which is in the Finder menu. This takes longer than the normal trash emptying, because your computer is actually writing nonsense data over the top of your deleted files.
10. Securely erase an entire hard disk
If you have an old Mac you are thinking of selling or throwing away, it might be a good idea to securely erase all the data from it. To do this you need to start up from the installer CD that came with your Mac by inserting it and holding the C key while the computer starts up. In the installer, choose Disk Utility from the menu bar.
If the hard drive you want to erase is not your main hard drive, you can skip starting up from the install disk and just open Disk Utility from the Utilities folder inside the Applications folder.
In Disk Utility, choose the hard disk from the list on the left, click on the Erase tab, and then click on the Security Options button. Now you have four levels of security to choose from. Each higher level of security takes longer to erase, so the 35-pass erase will take upwards of 24 hours and is only for the truly paranoid.
Of course, if you are throwing away the Mac or even just the hard drive, nothing works better and is quite as satisfying than the physical destruction option. Just take the hard drive out of the Mac and completely destroy it with a hammer.
A place to share your GeekTool setups
For those who don’t know, GeekTool is a preference pane that allows you to display different kinds of information on your desktop. These bits of information are called Geeklets, and they can be text, images, files, and the output of shell commands. Some of the most common things to use it for are displaying to do lists, today’s iCal events, the date, the current iTunes song and unread mail.
The latest version now allows you to save your Geeklets and share them with each other, so I’ve created a site just for that. It allows you to submit your Geeklets and vote on others to see which aremost popular. If you are new to this, it also has a page for getting started with GeekTool.
Here are a few tips for using GeekTool.
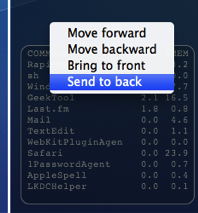
If you have overlapping Geeklets, you might find that the wrong one is on top. Just right-click on the Geeklet and change the order by choosing “Send to back” or one of the other options.
2. Don’t set refresh to zero
By default, GeekTool sets the refresh time to 0, which means it continuously refreshes as quick as it can. It is best to avoid this as it can take a considerable toll on your system, hogging resources and slowing things down. For things that really have to be updated very regularly, consider a refresh time of 5 or 10 seconds instead.
By putting your Geeklets into separate groups, you can quickly and easily enable and disable them based on their grouping. Note that Geeklets can be in multiple groups - as long as one of the is enabled, the Geeklet will be shown.
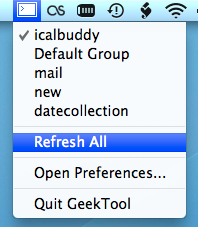
4. Use the menubar item
GeekTool now has a menubar item that you can enable from the preference pane. From here you can enable and disable groups, force a refresh on all Geeklets, disable GeekTool, and access the preference pane.
5. Check out other people’s Geeklets
Check out the Geeklets other people have posted to get some inspiration for your desktop. Vote up your favourites, and share your creations too.
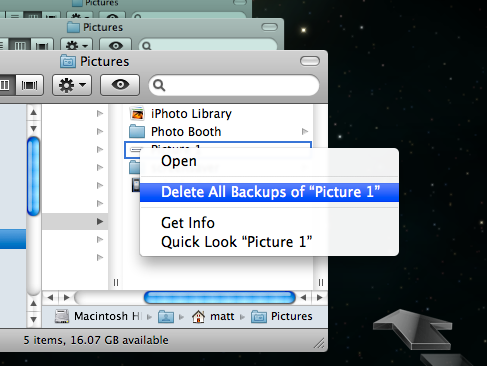
If you are looking to reduce the size of your Time Machine backup, it's quite easy to go through you backups and remove files
.Just enter Time Machine, locate the file you want to delete, right-click on it and choose "Delete All Backups..." But which files do you delete?
You want to get rid of large files, but not those that are important. The best way to do this is to use an application called GrandPerspective. Pierce Wetter has created a modified version of this application specifically for Time Machine backups.
It searches through your backups, and finds large files that have only been backed up once. These will be the files that either constantly change by small amounts or were only on your Mac for a very short time.It then produces a nice "map" of your backup, so you can easily see which files are taking up the most space. Hold you mouse over one of large boxes, and make a note of the backup date and location, shown at the bottom. Then just enter Time Machine, go to the date, and remove the backup as usual.
If you find that a lot of the files you are removing are in the same location, you might want to exclude that folder from the Time Machine backup. To do this, just go to the Time Machine section of System Preferences, click the Options button and then drag the folder into the list.
Comments
Post a Comment
Give Your Comments